[Account Owner] Setting Up Firm-Wide Engagement Workflows
If you are interested in learning more about how Advisor Segmentation can be used for your firm, check out this article: A Guide to Advisor Segmentation
In this Article:
With Engagements, all of the core functions available in AdvicePay -- invoicing, document eSignatures, approvals, and deliverables -- can be bundled together in fully automated sequences that make providing and overseeing fee-for-service financial planning both fast and compliant.
By setting up just a couple of simple workflows, your firm can hand off all the manual tasks involved in obtaining signatures, billing, and/or oversight to AdvicePay.
We'll automatically move the pieces of a client's engagement with your firm through each step you require -- from the moment a document and/or invoice is created by an advisor to the post-payment period when you need to collect and store deliverables while the client is receiving services.
This means a big boost in operational and billing efficiency, as well as a more consistent and reliable experience for firm advisors using AdvicePay!
Important: If documents have not been established with a document provider(DocuSign, Dropbox Sign, or Adobe Sign) on the account, please ensure they are "on" and established. This setting is located under Firm Settings > eSignature > Enable eSignature.
General Settings before Workflows
Note: When getting started with Engagements, by default, all Offices will have access to Engagements. The default Engagement at the top of the Engagement page is not used as part of this setting for Offices and Segmented workflows. You must create a brand new Engagement to begin Segmenting workflows for designated Offices.
-
To create a Segmented workflow for Advisors, it all begins with Offices. Navigate to the left sidebar under Accounts > Offices > Add Office.

Add as many Offices as you'd like to, but note that Advisors don't need to be added just yet. Once you're ready, create or re-assign Advisors to the correct Office that you'd like to have a Segmented workflow. If you need a bit more information on Offices, here is a helpful article on Setting up and Managing Offices.
- If your Segmented Engagement workflow requires eSignature, make sure to have it turned on within your AdvicePay account during this step. To turn on eSignature, navigate to Firm Settings > eSignature > toggle "on," and connect with AdvicePay (e.g. enable DocuSign or enable Dropbox Sign).

- Next, under Firm Setting >eSignature(tab) > Which offices will have access to eSignature? Add the offices that you want to use eSignature with, selecting some (add them), none, or all for the offices to either have or not have eSign.
- "All" allows all firm users to see and use the eSignature feature.
- "Some" allows select Offices only to see and use the eSignature feature. You must choose the names of the Offices you'd like to receive eSignature permissions in the box (as shown in the example above).
- "None" prevents all users from using eSignature.

When eSignature is toggled "on," the ability to send documents with your chosen eSignature provider is available to the entire firm. To restrict the ability to send documents to certain Offices, select the bubble "Some," and add them to the list. Only the selected Offices will have eSignature available to them to send documents within their AdvicePay account. Other users not in selected Offices can still see any eSignatures if they are requested of them, or existing documents in their Document Vault, but they won't be able to send documents.
Please make sure that the templates are available within your chosen eSignature provider. Once they are available within your chosen eSignature provider and assigned to specific Office(s) in AdvicePay, they will be available to those segmented Offices.
Tip: When turning on eSignature, the feature will be immediately available to the firm as the default is set to "All." Once the permissions setting is moved to "Some" or "None," only those Offices (or no one) will have eSignature access.
- Lastly, if you'd like to use personalized Engagement Workflows for designated Offices, this step outlines the process to ensure those specific Offices are assigned to the appropriate Engagement workflow.
Navigate to Firm Settings > Engagement tab to create a specific Segmented Engagement workflow(s). Scroll to the next section to learn more about the different customizable workflow options available to you.
Next, ensure the Segmented Offices that you'd like to experience this specific Engagement workflow are added. Depending on the workflow needed for each Office, you may have some Offices that have eSignature permissions, but are not assigned to a specific workflow. But, if the Offices selected to receive eSignature permissions also need to be part of a specific Engagement workflow, ensure they are also selected during the Engagement workflow creation (image shown below).

- "All" allows all Offices to experience all Engagements available
- "Some" allows Offices to be selected (as shown in the example above)
- "None" no Offices will have access to Engagements
Want to learn more about how Advisor Segmentation can work for your firm? Check out this step-by-step guide on: A Guide to Advisor Segmentation
Preparation: Pre-Review or Post-Review?
Before jumping into setup, it helps to determine which best describes your firm's requirements for advisors providing fee-for-service financial planning:
Pre-Review firms have supervision/compliance personnel that need to review documents, invoices, or both before they can be sent to the client.
Post-Review firms don't need to review documents or invoices before they are sent to the client. Supervision/compliance personnel audit or review documents, invoices, and/or deliverables after the client has signed their agreements and paid.
Engagement workflows can accommodate either approach! Click on the links below to jump to the instructions that best describe your firm.
Pre-Review Workflow Set Up
If you are a Pre-Review firm, we recommend the following workflow as a best practice:

To automate all of this within AdvicePay for maximum efficiency, your firm will first want to:
- Set the General Settings above, where Engagement workflows can be created per Office needs (if applicable)
- Enable an eSignature integration: Dropbox Sign, DocuSign, or Adobe Acrobat Sign
- Create needed Deliverable templates
Now, let's get started setting up an Engagement workflow! By default, all Offices will have access to Engagements. If you want to have segmented Offices with different workflows, please refer to A Guide to Advisor Segmentation for extra details on how this feature might work best for your firm.
1. Navigate to Firm Settings > Engagements

2. Since using an Engagement workflow when creating invoices and/or sending out documents is required when Engagements is active, by default, one engagement will be created for you already. Click Edit Workflow to begin adjusting the conditions.
Important: When creating separate workflows for different Offices, a New Engagement Workflow will need to be created since the Default Engagement cannot be used for this workflow.
3. To create a new workflow, click on Add New Engagement Workflow. This will open a modal to complete the new Engagement workflow. If you use the default Engagement instead, Rename the Engagement to capture the type of service a client may be engaged in (e.g. "Ongoing Financial Planning").
When multiple Engagement workflows are present, advisors in Segmented Offices will be selecting which one they like to send to their clients -- so it's best to make the name as clear as possible for them.

Make it simple! When starting, you may only want to have one or two workflows. We suggest starting with a One-time and an Ongoing.
- One-time is best used when your firm only needs to see one thing about the engagement in a 12-month period.
- Ongoing is best used for ongoing planning, OR planning paid for over the course of a period of time.
- Decide whether to allow your firm advisors, only the Home office, or no one to add new invoices to existing engagements using this workflow.
Best practice is to turn this "on" if your firm has evergreen financial planning agreements, and decide who would like to add additional invoices to an agreement. This will give the selected user types the ability to associate new invoices with an open engagement.
Toggle to on (green) to enable and select who you'd like to allow to add new invoices to existing engagements:

- Everyone allows all advisors, their admins, and the entire Home office to add new invoices to existing engagements.
- Selecting the Account Owner and their Admins only, they will have the ability to add invoices to existing engagements.
- Selecting None refers to nobody in the firm being able to add any new invoices to an existing engagement
Tip: Invoice approval requirements are honored for any new invoices added to an existing engagement as long as invoice approvals are being used instead of Engagement Fee Approvals.
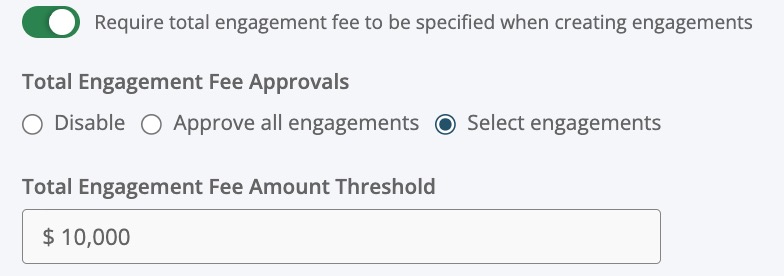
- Also, decide if you want the workflow to have a Total Engagement Fee (TEF). This means there will be a set limit for the Advisor to charge for the life of the Engagement. They can split that amount into different invoices or into a few subscription invoices, but the total would be the entire engagement total.
Please note that TEF Engagements must be set to: Disable, Approve all engagements, or Select
engagements. Note that approvals cannot be turned "on" for invoices and TEF; it must be one or the other. The threshold can be whatever you choose; below is just an example:
6. If using an eSignature integration (recommended), select which templates will be available for use with this specific Engagement workflow.
If none are selected, advisors will have access to all available firm-wide templates and can select their own.

Additionally, if eSign is enabled, you will also designate what should happen when a document is sent under Document Automation. (Currently, only the option shown below is available -- we'll be adding more scenarios soon!) Next, under Document Required, select Yes or No -- if "Yes" then an advisor must attach a document when using that Engagement.

Finally, you can also decide whether an advisor will be allowed to upload a "wet" signed document in PDF format instead of obtaining electronic signatures. (This is only available if eSignature is enabled on your firm account.)
Under Allow advisors to upload documents signed outside of AdvicePay select Yes or No -- if "Yes" then an advisor can attach a PDF version of their already-signed wet document when using that Engagement.

7. For Invoice Automation, select:
An invoice should be sent when A document is sent, following any required approvals. This will notify the Home Office of the firm that approval is required prior to anything being sent out to signers, including the client for the document or invoice.

8. Under Invoice Required, select Yes or No -- if "Yes" then an advisor must attach an invoice when using that Engagement.

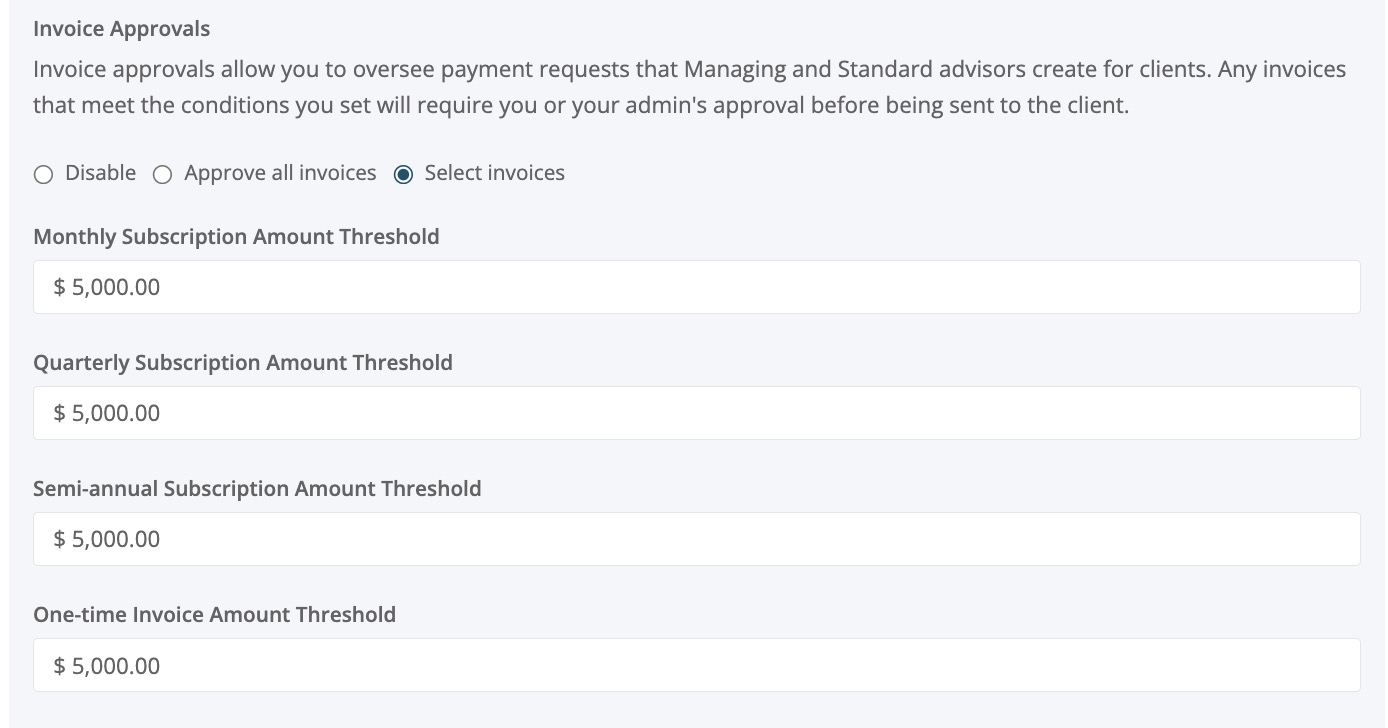
- Next, choose if and what invoice amounts to approve. You can select Disable, Approve all invoices, or Select Invoices. Selecting all invoices will allow you to add a threshold amount to determine what you want approved, as shown below:
10. Under Service Descriptions, select which descriptions of service will be available to the advisor when using the engagement. If no descriptions are selected, all descriptions will be available.

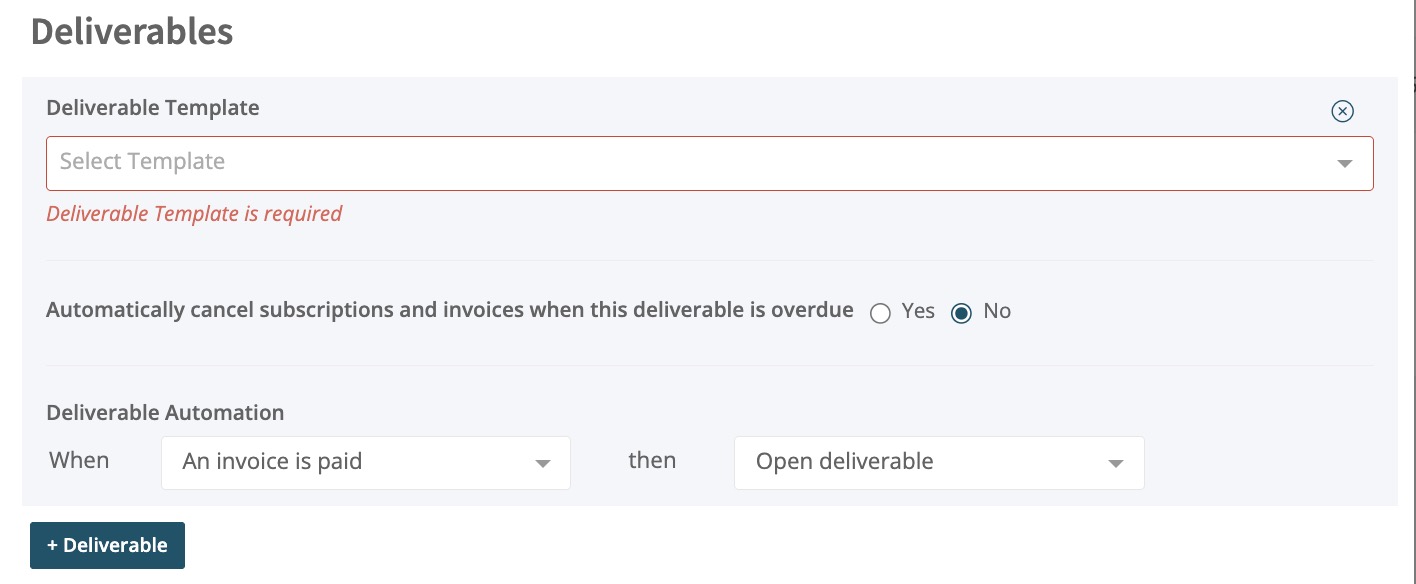
11. If using Deliverables (recommended), select the template(s) from the Deliverable Template drop-down menu that should be automatically used for this type of Engagement.
If no template is selected, then a deliverable will not be created.
- Under Automatically cancel subscriptions and invoices when a deliverable is overdue, select Yes or No.

If "Yes" is selected, then all unpaid invoices and active subscriptions for the client will be canceled when the deliverable is overdue.
Advisors will receive an email notice 7 days in advance of the deliverable due date, warning them of the deliverable status and upcoming cancellation.
If "Yes" is selected, you can also set a Grace Period (in days) to allow advisors time to submit the deliverable after it becomes overdue and before cancellations take place. (If set to 0, there is no grace period, and cancellations will take place immediately upon the deliverable becoming overdue.)

12. Under Deliverable Automation, select either:
When A document is signed, then Open deliverable
or
When an invoice is paid, then Open deliverable
13. You're done! Click the Save button at the bottom:

📍 Want to publish this workflow for immediate use by firm advisors?
Additional Engagement workflows can be created by selecting Add New Engagement Workflow and following the steps above. This is the process for creating separate workflows for specific Offices.

Tip: If you want to start with only one Engagement, this will be used automatically when advisors create and send invoices/documents. If more than one Engagement workflow is present and published, advisors will select which Engagement to use when creating and sending invoices/documents.
Post-Review Workflow Set Up
If you are a Post-Review firm, we recommend the following workflow as a best practice:

📌 To automate all of this within AdvicePay for maximum efficiency, your firm will first want to:
- Enable an eSignature integration: DropboxSign, DocuSign, or Adobe Acrobat Sign
- Create a couple of Deliverable templates
Now, let's get started setting up an Engagement workflow! By default, all Offices will have access to Engagements. If you want to have segmented Offices with different workflows, please refer to A Guide to Advisor Segmentation for extra details on how this feature might work best for your firm.
1. Navigate to Firm Settings > Engagements

2. Since using an Engagement workflow when creating invoices and/or sending out documents is required when Engagements is active, by default, one engagement will be created for you already. Click Edit Workflow to begin adjusting the conditions.
Important: When creating separate workflows for different Offices, a New Engagement Workflow will need to be created. The Default Engagement does not have an Office Segmentation option.
3. To create a new workflow, click on Add New Engagement Workflow. This will open a modal to complete for the new Engagement workflow. If you use the default Engagement instead, Rename the Engagement to capture the type of service a client may be engaged in (e.g. "Ongoing Financial Planning").
When multiple Engagement workflows are present, advisors will be selecting which one they want to use when creating and sending documents/invoices -- so it's best to make the name as clear as possible for them.
Make it simple! When starting out, you may only want to have one or two workflows. We suggest starting with a One-time and an Ongoing.
- One-time is best used when your firm only needs to see one thing about the engagement in a 12-month period.
- Ongoing is best used for ongoing planning OR planning paid for over the course of a period of time.
4. Decide whether to allow your firm advisors, only the Home office, or no one to add new invoices to existing engagements using this workflow.
Best practice is to turn this "on" if your firm has evergreen financial planning agreements, and decide who would like to add additional invoices to an agreement. This will give the selected user types the ability to associate new invoices with an open engagement.
Toggle to on (green) to enable and select who you'd like to allow to add new invoices to existing engagements:
- Everyone allows all advisors, their admins, and the entire Home office to add new invoices to existing engagements.
- Selecting the Account Owner and their Admins only, they will have the ability to add invoices to existing engagements.
- Selecting None refers to nobody in the firm being able to add any new invoices to an existing engagement
- Also, decide if you want the workflow to have a Total Engagement Fee (TEF). This means there will be a set limit for the Advisor to charge for the life of the Engagement. They can split that amount into different invoices or into a few subscription invoices, but the total would be the entire engagement total.
Please note that TEF Engagements must be set to Disable, Approve all engagements, or Select
engagements. Note that approvals cannot be turned "on" for invoices and TEF; it must be one or the other. The threshold can be whatever you choose; below is just an example:
If using an eSignature integration (recommended), choose which templates will be available for use with this specific Engagement workflow.
If none are selected, advisors will have access to all available firm-wide templates and can select their own.
Additionally, if eSign is enabled, you will also designate what should happen when a document is sent under Document Automation. (Currently, only the option shown below is available -- we'll be adding more scenarios!) Next, under Document Required, select Yes or No -- if "Yes" then an advisor must attach a document when using that Engagement.
Finally, you can also decide whether an advisor will be allowed to upload a "wet" signed document in PDF format instead of obtaining electronic signatures. (This is only available if eSignature is enabled on your firm account.)
Under Allow advisors to upload documents signed outside of AdvicePay select Yes or No -- if "Yes" then an advisor can attach a PDF version of their already-signed document when using that Engagement.
6. For Invoice Automation, select either:
When A document is signed then Send invoice automatically (* this is the existing behavior in AdvicePay)
or
When A document is sent then Send invoice automatically

7. Under Invoice Required, select Yes or No -- if "Yes" then an advisor must attach an invoice when using that Engagement.
- Next, choose if and what invoice amounts to approve. You can select Disable, Approve all invoices, or Select Invoices. Selecting all invoices will allow you to add a threshold amount to determine what you want approved, as shown below:
10. Under Service Descriptions, select which descriptions of service will be available to the advisor when using the engagement. If no descriptions are selected, all descriptions will be available.
11. If using Deliverables (recommended), select a template from the Deliverable Template drop-down menu that should be automatically used for this type of Engagement.
If no template is selected, then a deliverable won't be created.
12. Automatically cancel subscriptions and invoices when a deliverable is overdue, select Yes or No.
If "Yes" is selected, then all unpaid invoices and active subscriptions for the client will be canceled when the deliverable is overdue. Advisors will receive an email notice 7 days in advance of the deliverable due date, warning them of the deliverable status and upcoming cancellation.
If "Yes" is selected, you can also set a Grace Period (in days) to allow advisors time to submit the deliverable after it becomes overdue and before cancellations take place. (If set to 0, there is no grace period and cancellations will take place immediately upon the deliverable becoming overdue.)

13. Under Deliverable Automation, select either:
When A document is signed then Open deliverable
or
When an invoice is paid then Open deliverable
14. You're done! Click the Save button at the bottom:
Additional Engagement workflows can be created by selecting Add New Engagement Workflow and following the steps above:
Tip: If you want to start with only one Engagement, this will be used automatically when advisors create and send invoices/documents. If more than one Engagement workflow is present, advisors will need to select which Engagement to use when creating and sending invoices/documents.
Post-Review Workflow: Basic Setup Without eSign and/or Deliverables
For Post-Review firms who haven't yet implemented eSign and/or Deliverables within AdvicePay, Engagement workflows can still be used to automate the parts you want to use right now!
As you start taking advantage of AdvicePay's other features later on, you can begin seamlessly adding them into your workflows by editing what you've already created.
📌 If you'd like to have Offices with separate customized workflows, please check out: A Guide to Advisor Segmentation
1. Navigate to Firm Settings > Engagements
2. Since using an Engagement workflow when creating invoices and/or sending out documents is required when Engagements is active, by default, one engagement will be created for you already. Click Edit Workflow in the dropdown arrow to begin adjusting the conditions!
Important: When creating separate workflows for different Offices, a New Engagement Workflow will need to be created since the Default Engagement does not have these capabilities available.
3. To create a new workflow, click the Add New Engagement Workflow. This will open a modal to complete the new engagement workflow. If you use the default Engagement instead, rename the Engagement to capture the type of service a client may be engaged in (e.g., "Ongoing Financial Planning").
When multiple Engagement workflows are present, advisors will select the one they want to use when creating and sending documents/invoices -- so it's best to make the name as clear as possible for them!
Make it simple! When starting out, you may only want to have one or two workflows. We suggest starting with a One-time and an Ongoing.
- One-time is best used when your firm only needs to see one thing about the engagement in a 12 month period.
- Ongoing is best used for ongoing planning OR planning paid for over the course of a period of time.
4. Next, determine which offices can use this engagement workflow, if you want none, some or all. When selecting some, you can add the Offices you want to have access to use this Engagement.
Ensure you have Offices already added under the left sidebar Accounts, Offices, Add Offices.

- Decide whether to allow your firm advisors, only the Home office, or no one to add new invoices to existing engagements using this workflow. (By default, this is not allowed.)
Best practice is to turn this "on" if your firm has evergreen financial planning agreements, and decide who would like to add additional invoices to an agreement. This will give the selected user types the ability to associate new invoices with an open engagement.
Toggle to on (green) to enable and select who you'd like to allow to add new invoices to existing engagements:
- Everyone allows all advisors, their admins, and the entire Home office to add new invoices to existing engagements.
- Selecting the Account Owner and their Admins only, they will have the ability to add invoices to existing engagements.
- Selecting None refers to nobody in the firm being able to add any new invoices to an existing engagement
- Decide whether you want the workflow to have a Total Engagement Fee (TEF). This means there will be a set limit for the Advisor to charge for the life of the Engagement. They can split that amount into different invoices or into a few subscription invoices, but the total would be the entire engagement total.

Please note TEF Engagements must be set to Disable, Approve all engagements, or Select
engagements. Note that approvals cannot be turned "on" for invoices and TEF.
- Under Invoice Automation, select:
When A document is signed (or sent) then Send invoice automatically (* this is the existing behavior in AdvicePay)

8. Under Invoice Required, select Yes or No -- if "Yes" then an advisor must attach an invoice when using that Engagement.
(You will want to select Yes if just using Engagements to send invoices.)

- Next, choose if and what invoice amounts to approve. You can select Disable, Approve all invoices, or Select Invoices. Selecting all invoices will allow you to add a threshold amount to determine what you want approved, as shown below:
10. Under Service Descriptions, select which descriptions of service will be available to the advisor when using the engagement. If no descriptions are selected, all descriptions will be available.
11. When not using Deliverables, leave the Deliverable Template drop-down menu empty. Under Deliverable Automation, leave the options as-is. (Since a template is not selected, no automation will be used.)
Is your firm using Deliverables, but not eSign? Select the +Deliverable button to add a Deliverable and again for multiple.
Select a template from the Deliverable Template drop-down menu that should be automatically used for this type of Engagement.
Under Deliverable Automation, select:
When an invoice is paid then Open deliverable
For "Automatically cancel subscriptions and invoices when a deliverable is overdue", select Yes or No.
- If "Yes" is selected, then all unpaid invoices and active subscriptions for the client will be canceled when the deliverable is overdue. Advisors will receive an email notice 7 days in advance of the deliverable due date, warning them of the deliverable status and upcoming cancellation.
- If "Yes" is selected, you can also set a Grace Period (in days-see below) to allow advisors time to submit the deliverable after it becomes overdue and before cancellations take place. (If set to 0, there is no grace period, and cancellations will take place immediately upon the deliverable becoming overdue.)

If you need to add additional Deliverables, click the +Deliverable button to add more.
12. You're done! Click the Save button at the bottom.
📍 Want to publish this workflow for immediate use by firm advisors?
Additional Engagement workflows can be created when needed by selecting Add New Engagement Workflow anytime and following the steps above:
Tip: If you want to start with only one Engagement, this will be used automatically when advisors create and send invoices/documents. If more than one Engagement workflow is present and published, advisors will need to select which Engagement to use when creating and sending invoices/documents.
How to Publish Workflows
All approvals will take place on each Engagement for Invoice specific or Engagement approvals
When creating brand new Engagement workflows, your firm advisors will not be able to see or use them until you enable advisor access. This allows you to create workflows at your own pace, ensuring everything is good to go before advisors start using them with clients!
To open up a finished workflow to advisors when creating or editing a new Engagement, toggle the Which offices will have access to engagements button to "all" or "some." If selecting some, add the offices you want to have access in the search bar below that opens.

Note: The Default workflow is always visible to advisors. Create a new one by using the Add New Engagement Workflow button.
Editing/Deleting Workflows
Need to edit or delete a workflow? No problem!
Any workflow can be edited by clicking the drop-down arrow to the right of the Engagement workflow and clicking on Delete Workflow: l

Once you click Delete Workflow, select Yes! delete it!

Any workflow -- aside from that marked as the Default -- can be deleted by clicking the Delete Workflow or Delete when inside of the workflow modal.
Note: If an Engagement workflow is edited or deleted, it will not impact any Engagements already created using that workflow. The existing Engagements will continue to operate based on what was established at the time of creation.
If a new/updated workflow is needed for a client, they will need to be issued a new Engagement.
📍See below for more helpful articles related to sending Engagements: