[Account Owner] How to Merge an Engagement & Manage Engagements via Bulk Uploads
In this Article:
Ever create a new engagement that wasn't needed or a duplicate? No worries, we've got you covered with this amazing feature to merge two engagements in two different ways. In addition, you can now manage your engagements in one location on a downloaded .csv file. 🏆
When you merge two engagements using this feature, please keep in mind that one will be moved into the other while the other will be deleted/removed.
Important: Only the Home Office is able to perform these functions and see these options in their view. Once a merge is completed it cannot be reversed.
How to Merge an Engagement Using Merge Engagements Feature
Please keep in mind there might be restrictions when merging. The merging engagements must be for the same client.
The below follows for functions when merging:
- All items will move over, regardless of the status, to the remaining Engagement
- If only one agreement is on the Engagements it becomes the primary agreement
- If there are agreements on both Engagements, the primary agreement on the remaining engagements remains the primary agreement
- The primary agreement controls if an invoice can be paid/ or the subscription activated. If the primary agreement is unsigned then the client cannot pay.
To merge two engagements head over to Engagements in the left side panel. Click on the pulldown arrow (top right) and click Merge Engagements:

Next, select the client in the pulldown client box. Once selected, the next box for the To Merge will populate. This is the engagement to choose that will be moved and later removed after the merge.
The next box will populate Merge Into. This is the engagement that will exist when the merge is complete.
All invoices, subscriptions, agreements, documents, and deliverables will be merged into the new engagement with the exception that the primary agreement on the destination engagement becomes the primary agreement for everything merged into that engagement.
When Merging Document(s)/Agreement(s):
The best practice when merging engagements is to leave the one with the signed agreement. If two engagements are being merged and both have an agreement, the remaining engagement’s agreement will become the primary agreement.
The primary agreement controls the requirement that an agreement must be signed before an invoice must be paid. If the primary agreement is deleted, this will remove the invoices as well.

Next, click Merge and this pop-up will appear as seen below:

Once you select Yes, merge it! The merge will take place and there will be a brief green pop-up in the top right of the window showing The engagements have been successfully merged.
The merge is now complete and only one of the two will show in the client's profile!
How to Merge Engagements using the Bulk Engagement Management Feature
When merging engagements the below applies (same as above):
- Engagements must be for the same client to be able to merge them
- All objects (Documents, Invoices, Subscriptions, etc.) are combined into the remaining engagement, regardless of status.
- If there is an agreement on only one engagement, it becomes the primary agreement on the remaining engagement.
- If there are agreements on both engagements, the primary agreement on the remaining engagements remains the primary agreement.
- The primary agreement controls whether an invoice can be paid or the subscription can be activated. (Keep in mind that If the primary agreement is unsigned the client cannot pay.)
To get started head over and click on the Engagements in the left sidebar, then on the top right, use the pulldown arrow and click Bulk Engagement Management:


A box will appear to download the Bulk Management .csv file to download. Click the blue link "Download Bulk Engagement Management Template" (It should download fairly quickly)
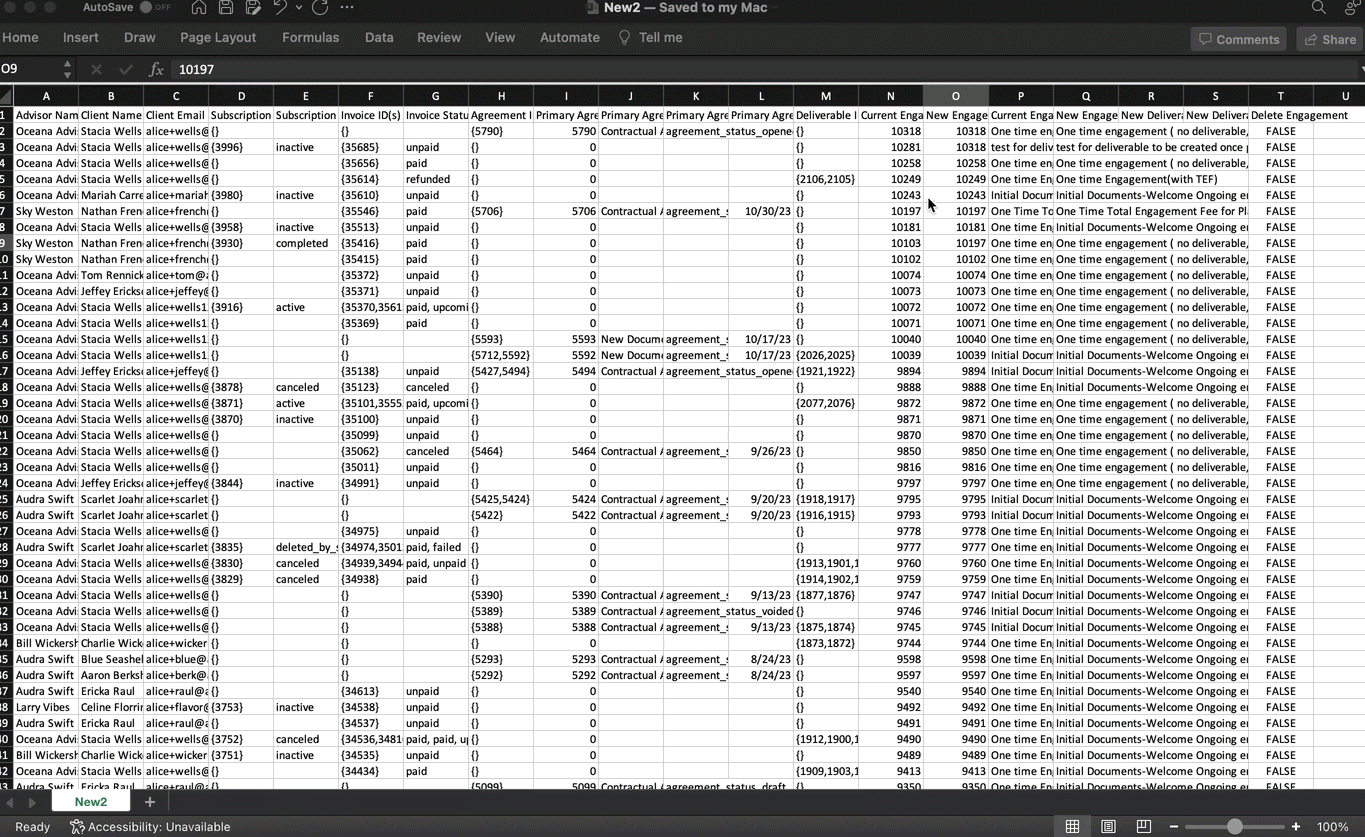
When opening the download, it will show a similar output (with your firm's Engagement information):

To merge engagements head over to the New Engagement column of the Engagement you would like to merge. Enter the Engagement number to match the one found under the Engagement you want to merge with and replace it. The two columns for the New Engagement for both should be the same number.
Next, save the .csv file and upload it the same way it was downloaded on the Bulk Engagement Management screen.
The two Engagements should thereafter be merged into one.
Here is a quick example of how to do this:
Once uploaded, click Review and Update. This will take you to the following pages to do so:

Next, review and update as needed on this final screen (below):

By default, all Engagements are selected (blue checkmark at left). To update them, leave those checked. If you don't want them to be updated, uncheck each.
Finally, click Update Selected (top right). If successful, a green banner will briefly let you know it has been updated at the top right immediately after.
If Engagements were merged, the remaining Engagement would have all the items from both and would be visible under the Engagements main screen under the remaining engagement ID.
How to Manage Engagements Using the Bulk Engagement Management Feature
This feature allows the Account Owner and Home Office the ability to:
- Delete engagements that are empty, voided, or have any opened non-eSign deliverables.
- Merge engagements (see above for both methods)
- Add Deliverables and Trigger Date to existing engagements
- Rename Engagement Template names
These items cannot be removed:
- Invoices/subscriptions (even if they are inactive/invoice is unpaid).
- Documents with a status (other than voided).
- Completed Deliverables.
To get started, head over to Engagements in the left side-bar and over to the top right pulldown arrow, and click Bulk Engagement Management:
A box will appear to download the Bulk Management .CSV file. Click the blue link "Download Bulk Engagement Management Template" (It should download fairly quickly).
When opening the download, it will show a similar output (with your firm's Engagement information):
This is the information on the Bulk Engagement download (.csv) is below:
- Advisor Name
- Client Name
- Client Email
- Subscription ID(s)
- Subscription Status(es)
- Invoice ID(s)
- Invoice Status(es)
- Agreement ID(s)
- Primary Agreement ID
- Primary Agreement Template Name
- Primary Agreement Status
- Primary Agreement Signed Date
- Deliverable ID(s)
- Current Engagement ID
- New Engagement ID
- Current Engagement Name
- New Engagement Name
- New Deliverable Template Name
- New Deliverable Trigger Date (MM/DD/YYYY)
- Delete Engagement
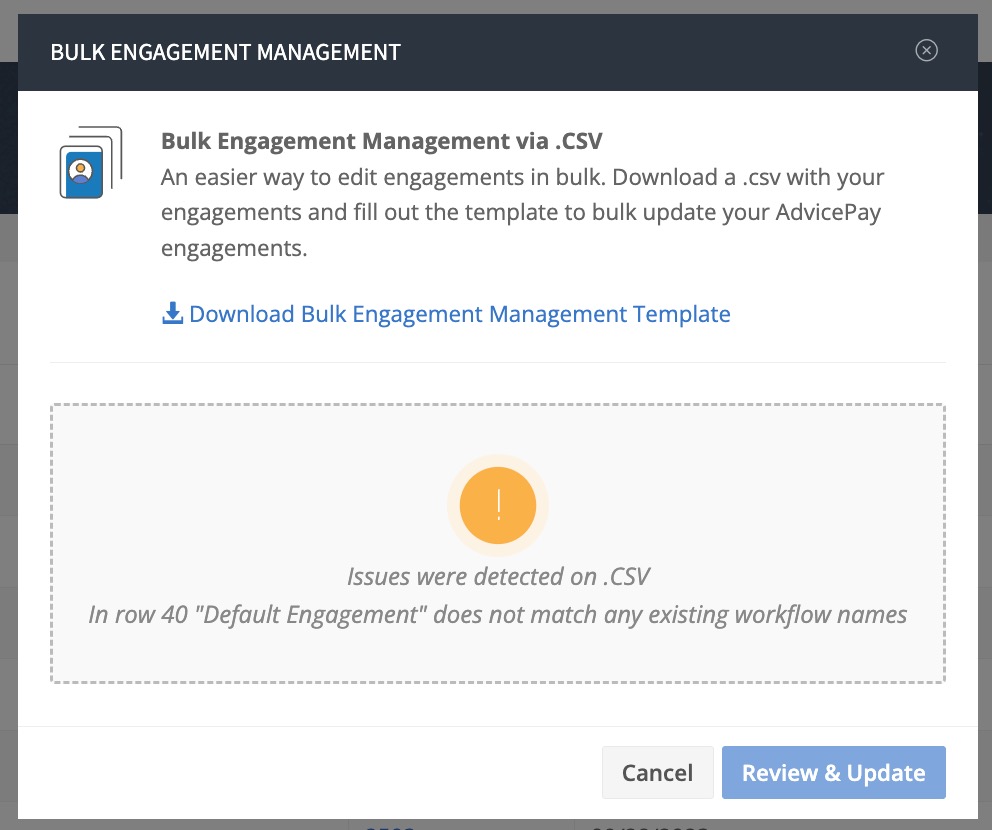
Tip: When initiating Engagements in your account all/any engagements that show as a Default will be required to be updated before re-uploading. Default Engagements can also be updated on each of them in your AdvicePay account under Firm Settings, Engagements, Edit. The updated Engagemet name on the .csv file must match with one in the settings to proceed.
If there are any Default Engagements, or old Engagements that are no longer in your workflow(Engagement or Deliverable settings currently) When you try to re-upload the .CSV , you might run into a similar error as below.
To fix this, the Engagement will need to be renamed if you want it to be updated to a recent workflow with a name that is currently being used. Otherwise, you can omit that data from the .CSV file and only upload those that you intend to update/manage.
How to Delete an Empty Engagement
To delete an empty Engagement that does not have any invoices, deliverables, or documents that are not marked as “voided."
1) Head over to Engagements, then to Bulk Engagement Management (top right arrow):
Download the .csv file, and locate the Engagement you'd like to remove. Change the column under Delete Engagement to TRUE.
Next, save, and re-upload. Confirm in the Update and Review page and the Engagement should be removed.
Important: If there are any invoices/subscriptions/signed documents of any kind, the engagement cannot be deleted using the .csv file method. (Those must be deleted in the user interface.)
How to Add a New Deliverable Template and Trigger Date to an Existing Engagement
- If the deliverable template has an Automated Due Date to open a number of days/weeks/months/years after an agreement signed date/invoice paid date, then the trigger date acts as the agreement signed date/invoice paid date.
- If the Due date is custom on the Deliverable Settings, the trigger date on the .csv file is the due date.
Find the two columns below and ensure the trigger date is added in the correct format. This is the date for the deliverable to be sent out to the Advisor(s).

How to Rename an Engagement Template
To change the name of an Engagement template (this must be changed to a name that is in the Firm Settings for Engagements currently), head over to Engagements, then to Bulk Engagement Management (top right arrow).
1). Download the .csv file, and locate the Engagement template you'd like to change under the column New Engagement Name.
2). Next, save, and re-upload. Confirm in the Update and Review page and the New Engagement Template should be updated from the old name.